Tuesday, July 31, 2012

Raspberry Almond Bundt Cake


Pin It!
Summer brings some of the most beautiful fruit! Deep red raspberries, dark purple blackberries, juicy blueberries...and all bursting with sweet, juicy flavor! 


So finally, berry-picking season is upon us. Okay, fine. I guess it's been upon us for quite a while, but I'm finally acknowledging it with a beautiful recipe! And if you're not all into the picking action, there were piles upon piles of plump berries at the grocery store last time I went.  


Ever since I started my first-ever pastry class about two weeks ago (more on that to come for sure!), I decided that I really like making individual-size desserts. There's just something so fun about a fresh pastry or cakelet handcrafted with a single person in mind. Or several single persons.


Could there be anything more perfect than a moist almond butter cake topped with a thin raspberry glaze? Not really. So please feel free to enjoy the most perfect mini cake of the season!


P.S. Frozen berries work great, too. 
P.P.S. You can make a regular bundt cake instead of the minis by increasing the total bake time if you aren't a fan of the minis.
P.P.P.S. Be sure to check out Domestic Goddess' raspberry seasonal posting, too!

Raspberry Almond Bundt Cake [click to print]
makes 6 mini bundts


For the cake
  • 2 tsp. sugar
  • 2/3 to 1 c. raspberries, roughly chopped
  • 2 c. flour
  • 1/2 c. almond flour
  • 1 T. baking powder
  • 1/4 tsp. salt
  • 3/4 c. sugar
  • 2 eggs
  • 1-1/4 c. buttermilk
  • 1/4 c. unsalted butter, melted
  • 2 tsp. vanilla extract
  • 2 tsp. almond extract
For the glaze
  • 2 to 3 c. powdered sugar
  • 1/2 c. raspberries, crushed with all their juices
Preheat oven to 350 F and generously coat with nonstick cooking spray (the kind with flour in it is best for bundts, I think). Sprinkle bottom of bundt pans with sugar, about 1/3 tsp. per pan. Divide berries evenly among pans and set aside. 

Whisk together flours, powder and salt; set aside. In separate bowl, whisk together sugar and eggs. Stir in buttermilk, butter and extracts. Stir in flour mixture until evenly combined. Pour batter into bundt pans and bake about 20-25 minutes or until top springs back when touched lightly. Allow to cool in pans about 10 minutes before turning turning out on wire rack to cool completely.

If the berries stick in the pan, just scoop them back onto the top of your bundt before glazing. To make the glaze, whisk together berries and sugar. Pour over cakes and garnish with toasted almond slivers.

Source: Adapted from Nook & Pantry

Thursday, July 26, 2012

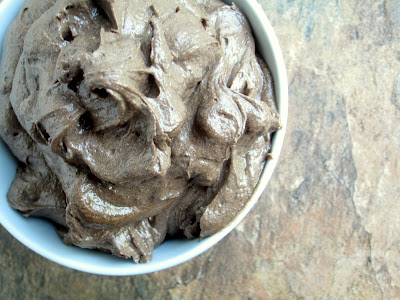
Salted Caramel Buttercream


Pin It!


Vanilla Bean Caramel Sauce makes me go weak at the knees. It's true. Just ask my mom, she's seen it happen. There's something perfectly heavenly about the aroma and creamy, rich flavor that gets me every time. You can make this buttercream without using homemade caramel sauce, but it will push it to the next level if you do...and I'll probably come over. Consider this your fair warning.


Plus, it's one of the easiest buttercreams to make. All you have to do is cream a batch of rich American Buttercream and whip in some salted caramel sauce. Mmmm.


Wondering what to do with this finger-licking good buttercream once it's whipped and ready? Here are some delicious suggestions:
Salted Caramel Buttercream [click to print]
Makes about 5 cups
  • 1-1/2 c. butter, softened
  • 6 to 7-1/2 c. powdered sugar*
  • 1-1/2 c. salted caramel sauce (if you're going totally homestyle, check out this recipe for Salted Vanilla Bean Caramel Sauce...yum!)
  • 1/2 c. cocoa powder
*For a thinner buttercream or to use as filling between cake layers, use 6 c. powdered sugar; for a spreadable buttercream that will hold its shape, use 7-1/2 c. 

Whip butter in large mixing bowl until smooth and creamy. Add about half of powdered sugar and half of caramel sauce. When well combined, add remaining sugar and, with mixer on low speed, beat in remaining caramel sauce until buttercream reaches desired consistency. Beat in cocoa powder until well combined. Eat by the spoonful. 

Source: Sugar Rush Original!

Tuesday, July 24, 2012

Homemade Snicker Bars


Pin It!


Several of my coworkers keep cute little dishes well-stocked with all kinds of candy. I guess I'm gonna need one soon, too, now that I have a desk! That's right. I have officially started my new position doing Development and Special Events and I'm so excited for a new challenge! And to decorate an office, but that's a matter for another time.


My favorite candy dish treat by far has gotta be mini Snickers bars. Those bite size things are so tiny it doesn't even count as eating anything and yet it fills your mouth with pure chocolate-caramel-peanuty goodness.


After eating more than I'd care to publicly admit, I had the thought, what if I made them myself? Very good and very bad idea all at the same time. And don't get scared off by the thought of making candy! The hardest part about this recipe is waiting for each layer to set. But it's oh so worth it!

Homemade Snicker Bars [click to print]
Makes one 9x13 pan


For Layer 1: bottom chocolate layer

  • 1-1/4 c. milk chocolate chips
  • 1/4 c. peanut butter chips
For Layer 2: nougat layer
  • 1 c. sugar
  • 1/4 c. milk
  • 1-1/2 c. marshmallow fluff
  • 1/4 c. peanut butter
  • 2 tsp. vanilla extract
  • 1-1/2 c. peanuts, chopped
For Layer 3: caramel layer
  • 14-16 oz. (1 bag) chewy caramels
  • 2 T. heavy cream
For Layer 4: top chocolate layer
  • 1-1/4 c. milk chocolate chips
  • 1/4 c. peanut butter chips
Line the bottom and sides of a 9x13" pan with parchment paper or plastic wrap. 

Layer 1: Combine chocolate and peanut butter chips in small heat proof bowl and melt over double boiler or in microwave until completely smooth. Pour into pan and spread to an even layer. Allow to set in refrigerator until firm. 

Layer 2: Combine sugar and milk in saucepan and heat on medium low until sugar is completely dissolved. Increase heat and bring mixture to a boil; continue boiling for 5 minutes. Remove from heat and add fluff, peanut butter and extract. Pour nougat over bottom chocolate layer and spread evenly. Sprinkle peanuts over nougat and allow to set and cool completely. 

Layer 3: Combine caramels and cream in saucepan. Heat until mixture is smooth and even. Pour over nougat layer and allow to set until firm. 

Layer 4: This is exactly the same as the first layer. Combine chocolate and peanut butter chips in small heat proof bowl and melt, stirring until completely smooth. Spread mixture evenly over caramel layer. Allow to set in refrigerator until completely firm.

Cut into bars or bites and enjoy!

Source: Adapted from Taste of Home

Monday, July 23, 2012

In Season: Cherries


Pin It!


I marched up and down and through every dirt road, corn field and briar patch on my grandparents' farm, formally known as "The Farm," and picked wild blackberries and raspberries and homegrown strawberries, fresh warm peaches, crisp apples...


But I had no idea there were wild cherry trees along the edge of the woods until my dad found them on a hike not too long ago. A precious find.


The most common kinds of cherries are the wild, or sweet, cherry and the sour cherry. They are in season in North America during the summer months, but peak season is in June. And if you're looking for something delicious to whip up with some fresh cherries, give these recipes a try:

Thursday, July 19, 2012

Cherry Limeade Cupcakes


Pin It!

I never even saw a Sonic in my life until I hung out with my AZ cousins one summer. Sure, I'd seen commercials, but I never went to one.


But, Rachel and Sarah were convinced that Cherry Limeade is the absolutely best drink in the world and you can only get it from Sonic. So of course we made a pit stop there one night.


They were right, Cherry Limeade is pretty good, but I wanted a stronger lime flavor and maybe in more of a desserty combination. Oh, yeah, it's cupcake time!


I love the flecks of neon red chopped maraschino cherries in the cupcakes and frosting. And the lime curd flavored filling really packs a refreshing punch!


Aren't cherries and lime a great summer combination?


Cherry Limeade Cupcakes [click to print]
Makes about 2 dozen


For the cupcakes
  • 2 c. flour
  • 1 tsp. baking powder
  • 1/2 tsp. salt
  • 1/4 tsp. baking soda
  • zest from 1 lime (about 1-1/2 T.)
  • 1/2 c. whole milk
  • 1-1/2 tsp. lime juice
  • 1/4 c. maraschino cherry juice
  • 1 tsp. vanilla
  • 1-1/2 c. sugar 
  • 1/2 c. unsalted butter, softened
  • 4 egg whites
  • 1/2 c. maraschino cherries, chopped
For the filling
For the buttercream
  • 4 c. vanilla buttercream (French Buttercream is a great choice))
  • remaining maraschino juice and cherries, chopped (from 16 oz. jar; about 1/2 c. juice and 1/3 c. chopped cherries)
Preheat oven to 350 F. Line cupcake tin or coat generously with nonstick cooking spray; the kind with flour in it would be great for these.

Whisk together flour, powder, salt, soda and zest; set aside. In another bowl, whisk together buttermilk, cherry juice and vanilla and set aside. 

Cream sugar and butter in mixing bowl until light and fluffy. Add egg whites, one at a time, incorporating well between each addition. Alternately add flour and buttermilk mixture, begging and ending with flour and beating between each addition until just combined. Stir in chopped cherries. 

Scoop batter into prepared cupcake tin, filling each liner about 2/3 full. Bake 15-18 minutes or until top springs back when lightly touched. When cool enough to handle, transfer cupcakes to wire rack to cool completely.

For the filling, beat cream on medium high speed until stiff peaks form. Gently fold in curd until evenly combined. Scoop filling into pastry bag fitted with large plain decorating tip. To fill cupcakes, poke tip into top of cupcake, about 1/2 inch deep, and squeeze small amount of filling. You'll see the top of the cupcake rise slightly.

For buttercream, whip vanilla buttercream and chopped cherries/juice in mixing bowl until fluffy and cherries are well distributed. Generously frost each cupcake and dig in!

Source: Cupcakes adapted from Gimme Some Oven

Monday, July 16, 2012

In Season: Strawberries


Pin It!

I grew up in a row home. There was a parking lot across the street with a little hill that grew the tiniest wild strawberries you've ever seen. I used to go out there and gather up handfuls with the neighbor kids. I'm not sure what I was planning to do with them, since I don't remember actually eating (many) but it sure was fun to pick! Strawberries are typically in season in the U.S. from June until mid-August.


Looking for a tasty strawberry recipe? Check these out:

Thursday, July 12, 2012

Double Chocolate Cookie Butter


Pin It!


Ah, yes. Cookie butter. It just may be my downfall. Curse upon you, Trader Joe's, for popularizing the stuff and practically forcing me to create and taste a variety of homemade flavors, thereby consuming a far more than healthy amount of delicious, creamy sweetness. 


I don't think I'll need to wear a belt this week.


I originally made up this recipe to sandiwch between a layer of dark chocolate cake and rich, semisweet ganache. Oh, my goodness. I think that made a heavenly birthday cake.


It's also quite possible that I ate the extra little leftover bit without sharing. Oops.


Maybe I'll start exercising self control this week.


Double Chocolate Cookie Butter [click to print]
Makes about 3 cups
  • 1/2 c. unsalted butter
  • 2/3 c. brown sugar
  • 1/2 c. granulated sugar
  • 1-1/3 c. flour
  • 1/2 c. cocoa powder
  • 1 tsp. vanilla extract
  • 1/2 tsp. salt
  • 1/4 c. plus 2 T. whole milk
  • 1/2 c. chocolate chips
Cream butter and sugars in mixing bowl until light and fluffy, about 3 minutes. Add flour, cocoa, vanilla and salt and mix until well combined. Beat in milk and chocolate chips. Store in airtight container in refrigerator until ready to use. 

Source: Adapted from Chocolate Chip Cookie Butter

Tuesday, July 10, 2012

Strawberry Banana Cupcakes


Pin It!

When I was little, we didn't really do milkshakes. I loved them, yes, we just didn't have them much. My favorite kind has gotta be oreo, packed with so many cookies there's just a little ice cream to help things slide down your throat. The only place fruit had in frozen treats/drinks was in a smoothie. And even then I was quite picky. 


My mom made an awesome strawberry banana smoothie. And so, instead of whipping up a blender full of that, I turned on the oven and baked in our 103 degree humid summer weather. Great idea, Molly.


But, I did promise I'd get my act together and whip up a batch of these babies! Plus they're really fast and easy. Please just tell me you still have some of that creamy French Strawberry Buttercream? A nice heaping mound of buttercream is perfect with these cupcakes since they're a little less sweet than most. Enjoy!


Strawberry Banana Cupcakes [click to print]
Makes about 24 cupcakes
  • 1/2 c. unsalted butter, softened
  • 1 c. brown sugar
  • 2 eggs
  • 2 tsp. vanilla extract
  • 2 c. flour 
  • 1 c. vanilla yogurt
  • 1 T. baking soda
  • 3/4 tsp. salt
  • 2 brown spotty bananas, about 1/2 c. mashed
  • 3 to 4 c. French Strawberry Buttercream
Preheat oven to 350 F and prepare muffin tin with liners or coat with nonstick cooking spray and set aside. 

In large mixing bowl, cream butter and sugar. Add eggs and extract, beating until well combined. Beat in flour, yogurt, soda and salt. Add mashed banana and mix until batter is well combined. 

Scoop batter into muffin tin and bake for 18 minutes or until top springs back when touched lightly.

Source: Adapted from Cupcake Project

Monday, July 9, 2012

In Season: Rhubarb


Pin It!

In the U.S., Rhubarb is in season from late April/May through late June or July. Rhubarb is an interesting plant/fruit/vegetable. Still not sure exactly how to stereotype it. Whatever you do, though, be sure not to eat the leaves, they're poisonous. Most often, rhubarb is baked into a sweet pie since it's slightly bitter, and it goes great with strawberries! 


Feeling adventurous? Test our Rhubarb in one of these recipes:


Saturday, July 7, 2012

French Strawberry Buttercream


Pin It!
Remember hearing about that huge, hurricane-strength thunderstorm that hit the mid/northeast? Yeah, I was part of that. We had a power outage. A massive one. 


I can't say going without a/c during the sweaty, humid summer months is my favorite. (Please note, I did say it's not a fave, not that I couldn't do it. I did grow up without a/c, it's just that, I think I'm spoiled now. And I kind of like it.) Or throwing out two cucumbers, among an abundance of other food, but cukes are probably the best veggie ever so I'm sure you understand the sentiment, because they got all gross and juicy. Sniff. Etc.


But two great things did come out of it all! First, I no longer need to plan a camping trip since I spent the weekend sleeping on our 9th floor balcony, half curled under a porch swing and around my 2-square-foot garden and coated in bug spray. Number two, since my fresh bananas are all spotty and my frozen strawberries got all clumped together, it is most definitely time for some heavily frosted cupcakes!


So I'm sorry, Domestic Goddess and Messy Kitchen, my contribution to last month's seasonal baking project (Strawberry) is a bit behind. Please forgive me, I blame Mother Nature.


P.S. Banana cupcakes go marvelously with this buttercream...recipe coming next week. Promise. [Update: Here's the recipe for Strawberry Banana Cupcakes!]

French Strawberry Buttercream [click to print]
Makes about 6 cups
  • 1 c. coarsely chopped strawberries
  • 1/2 c. sugar
  • 8 egg yolks, large
  • 2/3 c. sugar
  • 1/4 tsp. salt
  • 1 c. unsalted butter, softened
  • 1-1/2 tsp. vanilla extract
In medium bowl, combine berries and sugar; stir to coat and set aside to macerate for one hour. This will let the sugar dissolve as it sweetens and slightly softens the berries. Strain juice and use it for pancake syrup or something; put berries in food processor and pulse a few times until it's pureed with some small berry chunks still. Set aside. 

Whisk together sugar, yolks and salt in bowl of stand mixer. Place bowl over pot of hot water, making sure the water isn't touching the bottom of your bowl. The water should just be steaming, not boiling like crazy. 

Stirring continuously, heat yolk mixture until it reaches 150 F, about 5 minutes. Transfer bowl to mixer and whip on medium speed until bowl is completely cool and the mixture has approximately doubled in size, about 8 minutes. Begin adding butter, about 1 to 2 Tablespoons at a time, mixing well between each addition. Add extract and strawberry puree. Use immediately or seal in an air tight freezer baggie and freeze for up to 6 months. 

Source: Adapted from Brave Tart
Related Posts Plugin for WordPress, Blogger...