Tuesday, September 18, 2012

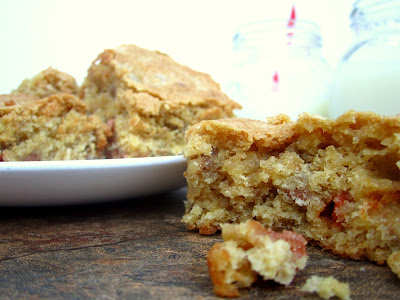
Brown Butter Butterscotch Blondies


Pin It!

I've done brown butter before, and that was my first mistake. There's something almost intoxicating about the smell of caramelized brown butter wafting through the air. And baked into a blondie...somebody hold me back! No, seriously. I have issues with self control.


And to top it all off, these things are so easy to make and they don't have any weird ingredients so you can probably whip up a batch right now! Unless of course you don't keep bags of butterscotch chips stashed away in your freezer...


So go ahead and pour yourself a tall glass of icy cold milk to go along with your blondie stack. Just trust me on this one.


Brown Butter Butterscotch Blondies [click to print]
makes about 16 bars
  • 1/2 c. unsalted butter
  • 1/2 lb. brown sugar
  • 2 eggs
  • 1/2 tsp. vanilla extract
  • 1-1/4 c. flour
  • 1-1/4 tsp. baking powder
  • 1/2 tsp. salt
  • 1 c. butterscotch chips
1) Preheat oven to 350 F and line 9x9 pan with parchment paper or coat generously with nonstick cooking spray. 

2) Melt butter in small saucepan, stirring continuously, until browned. The butter will start off bubbly and loud, then quiet down. Watch closely as it turns to an amber color and starts smelling like caramel; immediately remove from heat and pour into mixing bowl. Allow to cool about 10 minutes. 

2) Add sugar, eggs and vanilla, beating well until completely combined. Add dry ingredients and mix well. Stir in butterscotch chips. Spread mixture into prepared pan and bake 30-35 minutes. Allow to cool and cut into squares. 
Monday, September 17, 2012

Croissants


Pin It!

I always thought laminated doughs were hard and tedious and overly difficult for the average human/baker. Turns out that's not exactly true, but they do require a lot of patience.


Last week in my L'Academie pastry class, we finished a batch of absolutely beautiful croissants and I just might be in love.


When you make them right, croissants have a richly-colored crust and a variety of textures; if you take one between your fingers and give it a gently squeeze, you can hear the outer shell crackle and sweet steam escapes and you can't help but peel off a layer and savor every bite.

Thursday, September 13, 2012

Big Fat Chocolate Chip Cookies


Pin It!

It started when I flipped through some old recipe cards and found one my friend gave me for her famous chocolate chip cookies my freshman year at BYU. Then I was surfing through recipes and blogs and came across 52 Kitchen Adventures' Chocolate Chip Cookie Challenge (deadline to contribute is tomorrow!). And then I was over at another friend's house whipping out a batch of choux pastry and she pulled out a giant Costco bag of chocolate chips and said I could have them, she didn't know what to do with that many chocolate chips.


Seriously? I got this.


I have dreamed for years about the biggest, fattest, chewiest with a hint of crisp crust around the edges, beautiful chocolate chip cookies for years. I know, I may have a problem.


Also, these make excellent ice cream sandwiches.

Big Fat Chewy Chocolate Chip Cookies [click to print]
makes about 16 cookies
  • 3/4 c. unsalted butter 
  • 2 c. plus 2 T. flour
  • 1/2 tsp. baking soda
  • 1/2 tsp. salt
  • 1 c. dark brown sugar, packed
  • 1/2 c. sugar
  • 1 egg, whole
  • 1 egg yolk
  • 2 tsp. vanilla extract
  • 1 c. mini semisweet chocolate chips
1) Preheat oven to 325 F and line cookie sheet with parchment paper or coat generously with nonstick cooking spray. 

2) Over medium low heat, melt butter and continue heating, stirring occasionally, until browned. It will start off really bubbly and loud and then quiet down. Pay close attention at this point and watch the butter; as soon as it turns a beautiful amber color and starts smelling like caramel, remove from heat. There will be little brown bits at the bottom of the pan and that's good, so stop worrying. 

3) Whisk together flour, soda and salt; set aside. Combine sugars and browned butter in mixing bowl and beat until well incorporated, about 1 to 2 minutes. Add egg, yolk and vanilla; continue beating until smooth again, about 30 seconds. 

4) Slowly add flour mixture and beat until just combined. Stir in chocolate chips. Chill at least 30 min. (Don't skip the chilling part like I did on the first pan, or you'll get flat cookies and that's no bueno.)

5) Scoop dough onto prepared pan and bake 15-20 minutes. Edges of cookies should be set and firm to touch while centers are puffy and soft still. Allow cookies to cool on pan about 10 minutes before removing to wire rack. 

Source: Adapted from America's Test Kitchen

Tuesday, September 11, 2012

Cherry Vanilla Compote


Pin It!

Breakfast is probably my favorite meal of the day...even though I usually just grab an apple or something on my way out the door. I guess it would be more accurate to say breakfast food is my favorite. Ever. And any time of the day. I don't discriminate like that.


A friend suggested getting together for brunch a week or so ago and I've had sweet and savory breakfast combos floating through my mind pretty much every day. Let's just say, I need to start getting up earlier if I'm going to eat everything I'm planning on making!


And everyone knows that any good breakfast food...waffles, croissants, birthday cake...has to be accompanied by a flavorful syrup of sorts. I opted for a compote here, which is basically a syrup made even more amazing by packing it with chopped fruit. I think that means it's healthy. You can go ahead and quote me on that.

Cherry Vanilla Compote [click to print]
makes about 2-1/2 cups
  • 1/2 c. sugar
  • 1 T. cornstarch
  • 1/2 c. water
  • 1 T. lemon juice
  • 3 c. dark cherries (pitted and halved; keep juice if using frozen!)
  • 2 tsp. vanilla extract
1) In large saucepan, whisk together sugar and cornstarch. Add water and lemon juice. Stir over medium-low heat until sugar is dissolved. Bring mixture to a boil and continue heating about 2-3 minutes or between 170-180 F.

2) Stir in cherries and bring back to a boil. Continue boiling about 3 minutes or until cherries are just softened. Remove from heat and stir in vanilla.  Let cool and smother waffles, ice cream or test out a Dark Cherry Truffle Cake (coming soon)!

Source: Adapted from A World of Cake and Closet Cooking

Monday, September 10, 2012

Dreaming of Brioche


Pin It!

I took an overly long nap this afternoon and dreamed about brioche. Seriously. I wouldn't lie to you about something so delicious.


I woke up with visions of dark-crusted loaves of parisienne brioche steaming as I pulled them from the oven. This bread is so rich, that you can stick a slice in the toaster and hear it sizzle...without buttering it first. It's the perfect dough for sweet rolls or grilled cheese or anything your heart desires.

Thanks for the dreams, L'Academie.

Thursday, September 6, 2012

Raspberry Almond Tart


Pin It!

Even though it's September and the roads are clogged with school-traffic and beaches are seemingly abandoned, I refuse to believe that Summer is over. And technically, it isn't. 


So this is my attempt at a slow transition into the rich, comforting desserts of Fall and Winter. I never made a baked tart...or at all---before L'Academie. And even though they look hard, as most pastries do, they aren't actually that difficult! Just whip up a batch of almond cream, spread in your pastry shell, add berries and bake. It really is that simple.


P.S. This is especially delicious served warm.

Raspberry Almond Tart [click to print]
makes about ten 4" tarts

For assembly
  • 1 pkg. pastry dough, rolled about 1/8" thick or a little less
  • 2-3 c. raspberries
  • 3-4 T. apricot jam or apple jelly
For the custard
  • 1 c. unsalted butter, softened
  • 1/2 lb. sugar
  • 1/2 lb. almond flour
  • 5 eggs
  • 1 T. vanilla extract
  • 1/4 tsp. almond extract
  • 1 T. lemon zest
  • 1-1/2 oz. flour
  • 1/8 tsp. salt
1) Preheat oven to 350 F and generously coat tart pans (preferably with removable base) with nonstick cooking spray and set aside. Press pastry dough into 4" tart shells. (You can also use a larger tart shell or pie pan but baking time will be different.)

2) Beat butter in stand mixer until smooth. Add sugar and continue beating until combined. 

3) Spoon in almond flour, scraping sides of bowl as needed.

4) Add four of the eggs, one at a time. Beat last egg with fork and add a little; add about half of all-purpose flour mixture then half of remaining egg. Beat in rest of flour, egg and salt. Add extracts and zest. Scrape sides as needed and mix until well combined. 

5) Spread almond cream into prepared tart shells, filling about 1/2 to 2/3 full. Arrange raspberries on top of cream. Bake about 20-25 minutes or until cream is puffed and golden. Use pastry brush to coat top of tart with warmed apricot jam and enjoy!

Source: Adapted from L'Academie de Cuisine

Monday, September 3, 2012

In Season: Plums


Pin It!

Growing up, my dad would come whistling into our bedrooms early on Saturday mornings and try to guilt us out of bed to weed-whack the yard (we didn't have much grass, okay?), make a grocery store run or do "something productive."


And now suddenly, the grass can wait and we have enough cereal but heaven forbid we don't get to the Farmer's Market early enough! It's like the weekend would cease to exist without a bear claw (or two) and more fresh fruit and vegetables than two or three people can possibly consume in seven days.


And guess what? Plums are in season right now, so dig on into a bushel of juicy sugar plums, red plums, italian plums, black diamonds...there's about a million different kinds! The best time of year to dig into plums is May through October. Craving more than a simple mouthful of plums? Check out these tasty recipes:
Related Posts Plugin for WordPress, Blogger...