Showing posts with label marshmallow. Show all posts

Thursday, February 14, 2013

Cherry Vanilla Love Monsters (aka Whoopie Pies)


Pin It!


Let me just tell you one more time. I love holidays! Seriously, there might not be anything better than cutesy themed dessert and containers filled with festive sprinkles and sharing some goodies with friends! These Love Monsters don't take too long to bake or assemble and they're just so cute, who wouldn't wanna get bitten by the love bug today? Happy Valentine's Day!


Cherry Vanilla Love Monsters [click to print]
Makes about 36 whoopie pies

For the cake
  • 1/2 c. unsalted butter, softened
  • 1/2 c. granulated sugar
  • 1/2 c. brown sugar
  • 2 eggs, large
  • 1/2 c. milk
  • 1 tsp. vanilla extract
  • 2-1/4 c. flour
  • 1-1/2 tsp. baking powder
  • 1/2 tsp. salt
  • 1 tsp. baking soda
  • 1 pkg. candy eyes (I used Wilton Candy Eyes)
  • Sprinkles
For the filling
  • 1 c. unsalted butter, softened
  • 2 c. powdered sugar
  • 1 jar (7.5oz) marshmallow fluff
  • 1 c. cherry vanilla compote (or pie filling)
  • 2 tsp. vanilla extract
  • 1/4 tsp. salt
1) Preheat oven to 375 F. Line baking sheet with parchment paper or coat with nonstick cooking spray and set aside. 

2) In bowl of stand mixer, cream butter and sugars until creamy. Add eggs, one at a time, incorporating well between each addition. Beat in milk and vanilla. In separate bowl, whisk together flour, powder, salt and soda; gradually add to batter in about three additions. Beat until just combined. 

3) Scoop heaping teaspoons of batter onto prepared baking sheet, spacing about 2 inches apart. Add candy eyes to half of the cookies, placing eyes about 1/3 of the way towards the center of the cookie (otherwise the eyes melt when they bake). Bake one sheet of cookies at a time for about 10 minutes or until edges are just barely golden. Allow to cool on baking sheet about 5 minutes before removing to wire rack to cool completely. 

4) For the filling, beat butter and sugar until well combined and fluffy, about 3-4 minutes. Add fluff, vanilla and salt. Stir in pie filling, mixing until just combined. Spread filling on half the cookies and sandwich with the eyeball cookie halves. Fill small dish with sprinkles and roll edge of assembled whoopie pies in sprinkles to coat. 

Source: Adapted from Just Baked

Friday, April 27, 2012

S'more Bars


Pin It!


I was chattin it up with a friend last week about my sudden urge to buy a tent. And go camping. On the beach. And that, of course, reminded me how bad I'm pretty much always craving s'mores.


Unfortunately, I don't have a grill and I'm kind of scared of flaming gas stovetops. So my best option was to whip up a fat pan full of s'mores!


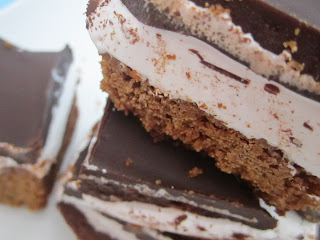
These bars have a nice thick layer of homemade graham cracker, smothered in a thick layer of marshmallow and coated with creamy ganache. The only thing they're missing is a little charcoal stuck in the mallows. But maybe that's not such a bad thing...


S'more Bars [click to print]
Makes about 25 squares


For graham cracker crust
  • 1-1/3 c. flour
  • 1/2 c. brown sugar
  • 1 tsp. baking soda
  • 1/2 tsp. salt
  • 1/2 tsp. cinnamon
  • 1/2 c. unsalted butter
  • 2 T. plus 2 tsp. honey
  • 2-1/2 T. whole milk
  • 1 T. vanilla extract
For marshmallow fluff
  • 2 egg whites
  • 1-1/3 c. light corn syrup
  • 2 tsp. vanilla extract
  • 1/2 tsp. salt
  • 1-1/3c. powdered sugar
For the chocolate layer
  • 2 c. milk chocolate chips
  • 1/2 c. heavy cream
Preheat oven to 350 F. Line 9x9 or 8x8 pan with parchment paper or generously coat with nonstick cooking spray and set aside.

Whisk together flour, sugar, soda, salt and cinnamon in bowl of stand mixer. Fit mixer with paddle attachment and beating on low speed, add butter. Continue beating until mixture looks like coarse meal.

In a separate bowl, whisk together honey, milk and vanilla. With mixer still on low speed, add to flour mixture and continue beating until just combined. Press dough evenly into bottom of pan.

Bake 20-25 minutes or until lightly browned. It should be a little firm to the touch. And it will smell amazing. Allow graham cracker crust to cool in pan on wire rack while you prepare marshmallow layer.

In large bowl, whisk egg whites until frothy. Add syrup, vanilla and salt. Beat with mixer on high speed until thickened (about 10 minutes). Reduce mixer to low speed and beat in powdered sugar. Add vanilla and mix until combined. Spread marshmallow fluff over graham layer. If you spray a spatula with cooking spray it's a little easier to spread.

Place chocolate chips in medium bowl and set aside. In a small saucepan, bring cream to a simmer over low heat. Pour hot cream over chocolate and allow to stand for 1-2 minutes. Stir or whisk mixture until chocolate is completely melted and texture is even. Pour over marshmallow layer and spread evenly. Allow to set in fridge until firm.

Source: Base adapted from Cherry Tea Cakes; Marshmallow adapted from 6 Bittersweets

Tuesday, April 3, 2012

Peep Brownie S'mores


Pin It!
I know Easter is about far more than pastel colors and plastic eggs and sugar covered sugar treats, but when I see those Peeps on the shelf, I know it's Easter in America! And while I'm admitting my shame, I'll tell you like it is: I'm an eye-eater. Bite off those beady little eyes and then nibble off the tail. After that, it doesn't really matter if you inhale the entire body in a single bite because those Peeps have been reduced to a sugary marshmallow blob at that point.


These sugar-laden bars are basically upgraded s'mores. Normal s'mores, as any normal person can attest, are pure deliciousness served on a crunchy bed of graham cracker. Now look at that graham crackery, chocolatey, Peepy goodness! I dare say that these s'more are just a little more exciting with their neon animal-shaped counterpart sitting atop a dense brownie and graham cracker crust.


The only bad thing is their eyes kind of melt away during the baking. But it's totally worth it.

Peep S'mores [click to print]
Makes about 20 squares


For Graham Cracker Crust
  • 1-1/2 c. graham cracker crumbs (about 1 sleeve graham crackers, crushed)
  • 1/3 c. sugar
  • 6 T. unsalted butter, melted
Preheat oven to 375 F. Line 8x8 pan with parchment paper and set aside. 

Combine all ingredients in bowl and mix until evenly combined. Press mixture into pan with the back of a spoon and bake for 7 minutes. Remove from oven and reduce heat to 325 F. 

For Brownie Layer
  • 10 T. unsalted butter
  • 1-1/4 c. sugar
  • 3/4 c. plus 2 T. cocoa powder
  • 1/4 tsp. salt
  • 1/2 tsp. vanilla extract
  • 2 large eggs, cold
  • 1/2 c. flour
  • 20 Peeps
In medium saucepan, combine butter, sugar, cocoa and salt. Stir on low heat until butter is melted and mixture is hot, but not boiling. You should be able to stick your finger in it (and lick it) and not cry. It's going to look kind of grainy and that's okay.

Remove from heat. Stir in vanilla. Beat in eggs, one at a time, incorporating well between each addition. Stir in flour; when combined, stir vigorously about 40 strokes. Pour batter over crust and bake for 25 minutes. Remove from oven and gently press peeps on surface, about one peep every two inches. Return to oven and continue baking about 5 minutes. Remove from oven and allow to cool just enough to eat while still warm.

Source: Inspired by Busy Mommy; Crust adapted from Make and Takes; Brownies adapted from Sis Boom Blog

Tuesday, March 13, 2012

Fruity Pebbles Crispy Treats


Pin It!

My niece, full of stubborn 5 year old wisdom, has said multiple times that she can't wait until she's a mom. Why? Because when you're a mom you can have whatever color hair you want! And what color hair does she want, you may ask? Rainbow!

While I'm not so sure I want to cash in on the kids and rainbow hair deal yet, I sure wouldn't mind a mouth full of rainbows. Plus, it's nearly St. Patrick's Day, so whip up a batch for the festivities! A word of warning, these crispy treats are absolutely delicious but also really sweet, so get ready for a sugar rush!


Fruity Pebbles Crispy Treats [click to print]
Makes about 16 squares (more if you like them skinny and small, but I go for LARGE and IN CHARGE!)
  • 10 oz (one bag) small marshmallows
  • 2 T. butter, room temperature
  • 1/4 tsp. salt
  • 1 tsp. vanilla extract
  • 6 c. Fruity Pebbles
Line 8x8" pan with parchment paper or coat generously with nonstick cooking spray.

Combine marshmallows, butter and salt in large microwave safe bowl. Heat mixture in 30 second bursts, stirring at each interval, until mixture is smooth. Stir in vanilla. Add Fruity Pebbles and stir until well combined; use a little less if you prefer super gooey treats.

Press cereal mixture into pan using lightly greased fingertips. Allow to cool, cut into squares and enjoy!

Thursday, January 26, 2012

Brown Butter Vanilla Bean Rice Crispy Treats


Pin It!

My Poppie always said that a good home always has marshmallows stocked in the cupboards. Let's just say my new fascination with gourmet rice crispy treats are only helping my cramped apartment become a cozy little home. With my new found love for all things browned butter, this idea seemed like the perfect way to jazz up an old favorite.


Brown Butter Vanilla Bean Rice Crispy Treats [click to print]
Makes about 16 super thick squares or 3 dozen normal size

4 T. unsalted butter
1 T. vanilla bean paste (OR seeds of 1 vanilla bean)
1/4 tsp. salt
10 oz. (one bag) marshmallows
5-1/2 c. rice crispies (or other puffed rice cereal)

For really thick squares, line 6x6" pan with parchment paper. For normal treats, line 8x8" pan. Pour rice crispies in large mixing bowl and set aside. 

First things first. Brown the butter, and no skimping here! Margarine won't give these treats a caramely flavor so use real butter, please! So, heat butter in saucepan on low until it turns a light brown, caramel color. It will bubble a lot and be noisy for a bit before it reaches a deep caramel color. Immediately add marshmallows and stir until well combined. Add salt and vanilla. 


Pour marshmallow mixture over rice crispies and turn with rubber scraper until evenly coated. Press into prepared pan with greased fingers and allow to cool. Cut into squares and enjoy!

Source: Adapted from Zoe Bakes
Related Posts Plugin for WordPress, Blogger...