Showing posts with label monster. Show all posts

Thursday, February 14, 2013

Cherry Vanilla Love Monsters (aka Whoopie Pies)


Pin It!


Let me just tell you one more time. I love holidays! Seriously, there might not be anything better than cutesy themed dessert and containers filled with festive sprinkles and sharing some goodies with friends! These Love Monsters don't take too long to bake or assemble and they're just so cute, who wouldn't wanna get bitten by the love bug today? Happy Valentine's Day!


Cherry Vanilla Love Monsters [click to print]
Makes about 36 whoopie pies

For the cake
  • 1/2 c. unsalted butter, softened
  • 1/2 c. granulated sugar
  • 1/2 c. brown sugar
  • 2 eggs, large
  • 1/2 c. milk
  • 1 tsp. vanilla extract
  • 2-1/4 c. flour
  • 1-1/2 tsp. baking powder
  • 1/2 tsp. salt
  • 1 tsp. baking soda
  • 1 pkg. candy eyes (I used Wilton Candy Eyes)
  • Sprinkles
For the filling
  • 1 c. unsalted butter, softened
  • 2 c. powdered sugar
  • 1 jar (7.5oz) marshmallow fluff
  • 1 c. cherry vanilla compote (or pie filling)
  • 2 tsp. vanilla extract
  • 1/4 tsp. salt
1) Preheat oven to 375 F. Line baking sheet with parchment paper or coat with nonstick cooking spray and set aside. 

2) In bowl of stand mixer, cream butter and sugars until creamy. Add eggs, one at a time, incorporating well between each addition. Beat in milk and vanilla. In separate bowl, whisk together flour, powder, salt and soda; gradually add to batter in about three additions. Beat until just combined. 

3) Scoop heaping teaspoons of batter onto prepared baking sheet, spacing about 2 inches apart. Add candy eyes to half of the cookies, placing eyes about 1/3 of the way towards the center of the cookie (otherwise the eyes melt when they bake). Bake one sheet of cookies at a time for about 10 minutes or until edges are just barely golden. Allow to cool on baking sheet about 5 minutes before removing to wire rack to cool completely. 

4) For the filling, beat butter and sugar until well combined and fluffy, about 3-4 minutes. Add fluff, vanilla and salt. Stir in pie filling, mixing until just combined. Spread filling on half the cookies and sandwich with the eyeball cookie halves. Fill small dish with sprinkles and roll edge of assembled whoopie pies in sprinkles to coat. 

Source: Adapted from Just Baked

Thursday, October 27, 2011

Design It: Ah! Monster!


Pin It!
Most monsters these days are creepy and bloody and mean. Not Fuzzbucket.


When I was little, this short, hairy, googly-eyed monster would follow me around everywhere. I'm not sure where he went when we weren't having fun together, but he certainly wasn't hiding under my bed since that's where all the alligators hung out, waiting to snack on unsuspecting ankles dangling over the edge of the bed during the night. And he liked ice cream and hopscotch and occasionally glowed in the dark. Yeah, my monster was pretty cool. 

And boy did he love a party! So be sure to invite him to your next Halloween bash or birthday party!

If you'd like to invite Fuzzbucket to your next Halloween bash, first bake your favorite cake in small round cake pans. You want a lot of layers here to give the monster some height. I used three 6-inch round cake pans and sliced each layer in half. You may need to double the recipe if you have a bigger cake. You'll also need two cake pop eyeballs. (Check out this post on Cake Pops for instructions.) For the monster cake, I dipped the back of each eyeball in colored dipping chocolate to create eyelids instead of drawing bloodshot veins to make them a bit more friendly looking.

So, bake cake as directed. Once cooled, fill the cake and give it a crumb coating. Allow this to set. And now for the fun part!

Monster Fuzz Buttercream Icing (aka Crusting Buttercream)   [click to print]
1/2 c. butter
1/4 c. shortening
6 c. powdered sugar
1/4 tsp. salt
2 tsp. vanilla
3-4 T. milk

Green gel food coloring
Yellow gel food coloring

Whip butter and shortening in mixing bowl until combined. Add sugar, salt, vanilla. Mix on low speed, slowly adding milk, a tablespoon at a time, until you reach desired consistency. You want this stuff to be fairly stiff; try holding the bowl upside down over your head, if the frosting doesn't threaten to drip onto your hair, you're good!

Measure about 1-1/2 cups of frosting into a separate bowl and add yellow food coloring until it's blindingly yellow. Like the sun. Scoop into pastry bag. Color the remaining frosting bright green. Frost your cake with a thin layer of green buttercream (you only want monster skin to shine through that fuzz!) and scoop the remaining green frosting into a separate pastry bag. Fit your green pastry bag with a grass tip; I used the Wilton 233 Multi-Opening Decorating Tip.
   
Holding the pastry bag about 1 to 1-1/2 inches from the base of the cake, squeeze out a string of monster fuzz until it reaches the cake base. Gently press decorating tip into the thin frosting layer to attach fuzz. Repeat process until your first row of fuzz is attached.


Make a second row of green fuzz about 1-1/2 inches above your first, overlapping the first layer by about 1/2 inch. Next do one row of yellow fuzz using the same size decorating tip. Follow this by two more rows of green fuzz. Your final row of yellow fuzz will be mostly on top of the cake, with about a 1/2 inch overhang onto the monster body. To cover the top of the monster head with fuzz, squeeze out strings of frosting and attach in concentric circles, slightly overlapping each row until the top is completely covered.


I know your hand is tired and shaky now from squeezing that silly pastry bag for so long, but hang in there! The last thing you need to do is poke those eyeball cake pops into the top of the monster body and you're done!


Source: Inspired by Sugar Turntable and Shindig Diva

Tuesday, October 25, 2011

Jeepers Creepers!


Pin It!

Ah! Who put those things in my fridge?! These cake balls and cake pops are sure to get you in the Halloween spirit! Bakerella has great step-by-step instructions on how to make all kinds of cake pops, but here are the basics:

Cake Pops and Cake Balls   [click to print]
1-13x9 Cake, baked and cooled
2 c. Frosting, any flavor (or 1 can store-bought frosting)
Lollipop Sticks
Cardboard box or styrofoam cube

Poke holes in box/cube to fit lollipop sticks. This will be your stand to allow cake pops to harden without getting a flattened side. Crumble up cake in bowl. Add frosting and mush together with the back of a spoon. Scoop out mounding tablespoons and roll into balls.

For Eyeballs...
White Chocolate Candy Melts
1 c. Chocolate Chips
Red edible ink marker

Melt bag of White Chocolate Candy Melts in deep bowl. Dip end of lollipop stick in chocolate and insert into cake balls. Allow to harden in the refrigerator for about 10 minutes. Dip cake balls into melted chocolate and cover completely. Place in stand and allow to harden. Melt chocolate chips and scoop into ziploc bag; snip off small corner and pipe pupils onto cake pops. Draw on bloodshot veins with a red edible ink marker.

For Mini Monsters...
Purple Chocolate Candy Melts
Green Chocolate Candy Melts
White Dragees

Melt each chocolate in separate bowls. For mini monsters on a stick, dip lollipop stick in chocolate and insert into cake balls. Allow to harden in the refrigerator for about 10 minutes. For mini monster cake balls, just skip the lollipop stick part. Dip half the cake balls in purple chocolate and the other half in green chocolate, being sure to tap off any excess chocolate and place on wax paper or in stand. Before they harden, give each monster two (or more) eyeballs by lightly pressing white dragees into the chocolate. Allow cake balls/pops to harden. Melt chocolate again and drizzle over each cake ball or pop until they resemble hairy beasties. You can do this using a fork or by filling a ziploc bag with melted chocolate and snipping off a tiny corner. Allow to harden.


For Skulls...
White Chocolate Candy Melts
Silicone Skull mold (for ice cubes)

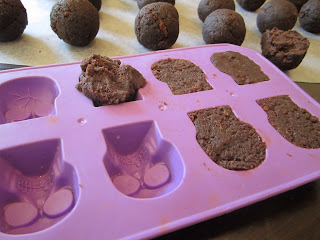
This is probably the easiest and fastest version of cake balls ever. Press 1-2 T. cake ball mixture into mold. Allow to harden in freezer for about 10 minutes. Remove from mold. Using a fork, dip skull in chocolate and tap off any excess. Place skulls on wax paper and allow to harden.

Source: Adapted and Inspired from Bakerella
Related Posts Plugin for WordPress, Blogger...