Thursday, May 31, 2012

Rhubarb and Strawberry Gingered Shortcake


Pin It!

But I'm getting braver and my tastebuds are becoming more adventurous, so when my new blogger buddies (Yes! I have food blogger friends!) over at I Wanna Be a Domestic Goddess and Diary of a Messy Kitchen told me that the In Season challenge ingredient this month was Rhubarb. Weird, was my first thought. 


I didn't know people actually ate rhubarb. Sure, I saw it in the grocery store occasionally, but really? There's just something in me that never really loved the idea of eating a vegetable that looks like bright red celery, but with a poisonous, leafy upgrade. 

But trust me, this shortcake is a game changer. 


The rhubarb adds a hint of tart that punches up the strawberries to a new level of deliciousness. And the shortcake biscuits are just barely sweet with a touch of ginger that adds a depth of flavor without the intense heat.


Seriously. I just might eat rhubarb again.

Rhubarb and Strawberry Gingered Shortcake [click to print]
Makes 8-10 servings


For the sauce

  • 1 lb. strawberries, quartered (about 3 cups) plus 2 T. sugar 
  • 1/2 c. sugar
  • 1/3 c. water
  • 1-1/2 c. rhubarb, cleaned and chopped 
  • 1/2 T. lemon juice
For the shortcake
  • 2 c. flour
  • 1 T. sugar
  • 4 tsp. baking powder
  • 1 tsp. ground ginger
  • 3/4 tsp. salt
  • 4 T. butter, slightly softened
  • 3/4 c. whole milk
  • 2-3 T. coarse sugar (i.e. turbinado)
First make the whipped cream by combining cream and sugar in a medium mixing bowl. Whip on high speed until the mixture thickens and forms stiff peaks. Set in refrigerator to chill. 

In another bowl, combine strawberries with 2 T. sugar and set aside to macerate for about 1 hour while you work on the next steps. (P.S. Macerate means the sugar will start to pull out the juices from the berries and make an awesome all-natural sauce.)

Combine remaining sugar and water in saucepan and heat until sugar dissolves. Add rhubarb and bring to a simmer; cook for about 20 minutes until rhubarb is softened and mushable. Remove from heat, stir in lemon juice and allow to cool for room temperature. Stir in strawberries and any berry juices. 

Preheat oven to 400 F. 

Whisk together flour, sugar, powder, ginger and salt. Cut in butter. Stir in milk until just combined. Scoop large spoonfuls of dough onto prepared baking sheet, spacing about 2 inches apart; I used a 3 T. cookie scoop (and I'm in love with cookie scoops!). Sprinkle tops of dough balls with a coarse sugar and bake for 15 minutes or until lightly golden brown. 

Allow shortcakes to cool until you can handle them. Slice each cake in half and fill with a mound of fresh whipped cream and a generous scoop of sauce. 

Source: Adapted from Food Network...here and here

Tuesday, May 29, 2012

Maple Pumpkin Bread


Pin It!

It was nasty humid the other day and I was baking bread. Ridiculous, I know. I just needed something fragrant and warm and our crazy weather patterns have got my internal cravings all confused. But my arteries were begging for something that wouldn't automatically cut off the blood flow to my entire body.


So, you guessed it. I've got another flavor-packed bread with no added sugar and it's butter-free! This time pumpkin and maple are hanging out together and it's a very tasty thing.

Maple Pumpkin Bread (No sugar added, Dairy Free) [click to print]
Makes one loaf
  • 2 c. flour
  • 1 tsp. baking soda
  • 1 tsp. ginger
  • 1 tsp. cinnamon
  • 1/2 tsp. cloves
  • 1/2 tsp. salt
  • 3/4 c. maple syrup
  • 1 c. pumpkin puree
  • 1 tsp. vanilla extract
  • 2 eggs
Preheat oven to 250 F. Line loaf pan with parchment paper, leaving a few inches overhang on each side, or generously coat loaf pan with nonstick cooking spray. 

Whisk together flour, soda, spices and salt; set aside. In mixing bowl, beat syrup, pumpkin and vanilla until well combined. Add eggs. Stir in dry ingredients and continue mixing until just combined. 

Pour batter into prepared loaf pan and bake for 60-65 minutes or until done. 

Source: Adapted from Banana Honey Bread

Thursday, May 24, 2012

Dark Chocolate Whoopie Pies with Chocolate Chip Cookie Butter Filling


Pin It!


Ever have one of those days (or weeks) where you just need to curl up on your bed with a fluffy pillow and a big fat spoonful of cookie dough and watch a couple episodes of The Biggest Loser or The Next Food Network Star? Yeah, I totally understand. Life's been a little rough around here, lately.


But good things have been happening, yes. Jars of cookie butter. Mountains of whoopie pies. Discovering the existence of white chocolate cocoa powder (what!). Getting a new position at work. All very good and exciting!


But other life issues have been stressing me out, so it was a lucky thing that I got these whoopie pies out of the house before I finished them off on my own! It was very tempting. And to you skinny minnies who eat two cookies and moan about overdoing it, you have no idea who you're dealing with.


The whoopie shells are nice and soft and moist and not overly sweet, striking a perfect balance with the thick layer of cookie butter stuffed between them. Yummers!

Dark Chocolate Whoopie Pies with Chocolate Chip Cookie Butter Filling [click to print]
Makes about 24 pies
  • 1-2/3 c. flour
  • 1/2 c. cocoa powder
  • 2 T. plus 1-1/2 tsp. black onyx cocoa powder*
  • 1-1/2 tsp. baking soda
  • 1/2 tsp. salt
  • 1/2 c. unsalted butter, softened
  • 1 c. brown sugar
  • 1 egg
  • 1 tsp. vanilla
  • 1 c. sour cream
  • 1-1/2 c. Chocolate Chip Cookie Butter
*I realize normal people don't have black onyx in their pantry (or bookshelf shoved back behind their dining room table, in my case), so you can use 2/3 c. total cocoa powder instead of the combination of cocoa and black onyx, they just won't be as dark.

Preheat oven to 375 F. Line baking sheet with parchment paper or coat generously with nonstick cooking spray; set aside.

Whisk together flour, cocoas, soda and salt; set aside. In another bowl, cream butter and sugar until fluffy, about 5 minutes. Add egg and vanilla, beating until completely incorporated. Alternately add flour mixture and sour cream in about 3 additions, beginning and ending with flour. Continue mixing until just combined.

Scoop tablespoons of batter onto prepared sheet, spacing each batter blob two inches apart. Bake about 10 minutes or until cake springs back when lightly pressed.

Allow cakes to cool about five minutes on baking sheet before transferring to wire rack to cool completely. Spread flat side of half of cakes with cookie butter and sandwich with remaining cakes.

Source: Adapted from The Novice Chef

Tuesday, May 22, 2012

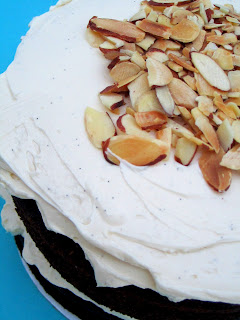
Chocolate Almond Cake with Vanilla Bean Buttercream


Pin It!
I'm watching The Biggest Loser online as I soften butter and scoop sugar and bake for hours on end. Definitely one of my favorite hobby combinations. 


Just a warning about this buttercream, the recipe below makes waaaay more than you need and the flavor is rich and buttery perfect. It also freezes really well if you're not in the mood to cuddle up with your mixing bowl. And it is kind of a pain to make in small batches, so go for the whole big thing! You won't be sorry, unless of course you have no self-control. In which case, I can relate.


I mean, do you see those gorgeous vanilla bean flecks throughout all that oozing, fluffy buttercream? Probably you'll only use about 2-3 cups for the layer cake and maybe a little more than that if you smother cupcakes like I do. Awesome. And the toasted almonds on top give the perfect little crunch, so don't skip those!


Chocolate Almond Cake with Vanilla Bean Buttercream [click to print]
Makes one 2-layer 6" cake or about 12 cupcakes


For the Cake
  • 1 c. plus 2 T. all-purpose flour
  • 1/4 c. plus 2 T. almond flour*
  • 3/4 c. sugar
  • 1/2 c. cocoa powder
  • 1 tsp. baking soda
  • 1/2 tsp. salt
  • 1/2 c. butter, softened
  • 1/2 c. sour milk
  • 1/2 c. warm water
  • 1 tsp. almond extract
  • 1 egg
  • 1/2 c. almond slices, toasted
For the Buttercream (makes about 8 cups)

  • 10 egg whites (about 1 cup)
  • 2 c. sugar, granulated not powdered!
  • 2 c. unsalted butter, softened
  • 1/4 tsp. salt
  • 1 T. vanilla bean paste (OR seeds from one vanilla bean OR 1 T. vanilla extract)

*If you don't have almond flour, you can just use all-purpose flour instead, the almond flavor won't be quite as strong but will definitely still be delicious!

Preheat oven to 350 F. Prepare two 6" cake pans with parchment paper or coat bottom with nonstick cooking spray. Alternately, prepare muffin tin with liners or coat generously with nonstick cooking spray and set aside.

In large mixing bowl, whisk together flours, sugar, cocoa, soda and salt. Add butter, milk, water, extract and egg. Mix just until no butter chunks remain and mixture looks even. Spread batter into cake pans or scoop into cupcake liners. Bake cake layers for 32-38 minutes or cupcakes for 20-25 minutes or until center springs back when lightly touched.


Meanwhile, get working on that buttercream! You can make this ahead of time, too, if you want. It keeps great in the refrigerator or freezer.

Fill a saucepan with a couple inches of water and nest a heat safe bowl (like ceramic or glass) on top, but don't let that bowl touch the water! Whisk together egg whites and sugar until well combined and bring water to a simmer. Continue whisking until the sugar melts completely and the mixture reaches 160 F and the sugar is completely melted. Test this by rubbing a drop between your fingers and if it's still gritty, keep heating and whisking.

Once smooth, remove from double boiler and whisk in salt. Pour mixture into bowl of stand mixer and mix on high speed with whisk attachment. Once the mixture comes to room temperature, about 10-15 minutes, you'll have a beautiful meringue.

Change to the paddle attachment, if you have one, and add butter to the meringue, about 2 Tablespoons at a time. Make sure each chunk is fully incorporated before adding the next bit. Continue adding butter until all chunks are fully incorporated and mixture is smooth and creamy. Add extract and mix to combine. 

Troubleshooting woes...At this point, you may be getting nervous because your buttercream is looking a little strange, but don't give up! If it's runny or soupy...stick the whole bowl in the fridge for about 10-15 minutes to firm up and then whip on medium-high speed until it gets smooth. If it's curdled and sick-looking...just keep mixing! It will smooth out and look delicious again.


Source: Cupcake recipe adapted from Oh SO Delicioso; Buttercream adapted from Lemon Ombre Cake with Vanilla Swiss Meringue Buttercream

Thursday, May 17, 2012

Lime Zested Curd


Pin It!

I think I'm about over my fear of the dreaded curd. While I still think curd is kind of a gross word, this stuff is so good! I love how this stuff really enhances and delici-fies the tangy flavor of citrus fruit. 


The first thing you're gonna do, is cream the butter and sugar. Then beat in the eggs. I know it's a little nontraditional as far as curd-making goes, but trust me. This is by the far the easiest way to make sure your little eggies don't cook in nasty clumps when you start heating the mixture. Then you'll add the lime juice...and it's okay if it looks kind of curdled after you beat in the eggs---take a breath and don't worry so much!


Then you're gonna whisk the mixture continuously in your makeshift double boiler until it turns fabulously smooth. No straining required!


Stir in the zest and you have some of the best stuff on the planet just waiting for you to eat up! Need some ideas besides consuming curd by the spoonful? How about these tasty treats: 
  • Serve on scones
  • Sandwich a dollop between two butter cookies
  • Swap out buttercream for curd between cake layers
  • Swirl some into cheesecake
  • Save a cup for Coconut Lime Semifreddo (recipe coming soon, I promise!)


Lime Zested Curd [click to print]
Makes about 2 cups
  • 6 T. unsalted butter
  • 1/3 c. sugar
  • 2 eggs
  • 2 egg yolks
  • 1/2 c. lime juice
  • 1/8 tsp. salt
  • 1 T. lime zest
In medium size, heat proof mixing bowl, cream butter and sugar until light and fluffy. Add eggs and yolks, one at a time, incorporating well between each addition. Beat in lime juice, eggs and salt until well combined; don't worry if it looks kind of curdled right now, it will smooth out as it cooks.

Place bowl over simmering pot of water, but don't let the water touch the bottom of the bowl. Whisk mixture over low heat until the butter melts and the texture smooths out. Increase heat to medium, whisking constantly to prevent scorching. The mixture will begin to thicken and you may see a few slow, fat bubbles appearing; that's okay, but if there are a lot, it's boiling and you should immediately reduce heat. 

The curd is done when it coats the back of a spoon and your finger leaves a clear path when drawn through. Pour into clean bowl and press a piece of plastic wrap against surface of curd. Store in the refrigerator for 7-10 days or in the freezer for a couple months. 

Source: Adapted from One Perfect Bite
Related Posts Plugin for WordPress, Blogger...