Tuesday, March 27, 2012

Faux Chicken Drumsticks


Pin It!

Two years ago, my nieces sat down to dinner, thrilled that they were getting chicken pot pie and fancy frosted cupcakes for dinner. Until they took a bite. Alli was absolutely disgusted, well, maybe furious is a better word for it, that those cupcakes were actually meatloaf topped with neon mashed potatoes! After some explaining that it was just a joke, a very angry Alli stormed off to her room while Maggie giggled and continued eating. Funny girls!


Last year, even Alli managed to enjoy an April Fool's spread of hot dogs and french fries. Not sure what Breezi has planned this year, but I think some chicken drumsticks could be a quick crowd pleaser!


These guys are easy to make and quite tasty, if I do say so myself. Pretty much they're just chicken flavored rice crispy treats...april fool's! They're just regular old rice crispy treats, shaped into drumsticks and covered with a brown sugar glaze. The rice crispies naturally give them that crunchy breaded look. Mm!
Faux Chicken Drumsticks [click to print]
Makes about 22 drumsticks
For the rice crispies
  • 2 T. unsalted butter
  • 2 tsp. vanilla extract
  • 1/4 tsp. salt
  • 10 oz. (one bag) marshmallows
  • 6 c. rice crispies (or other puffed rice cereal)
Melt butter in large microwave safe bowl. Stir in vanilla and salt. Add marshmallows and microwave until completely melted and gooey in 30 second bursts, stirring well between each nuke. Stir in rice crispies and spread mixture out loosely on large piece of parchment paper. Allow to cool.
For the brown sugar glaze
  • 1/2 c. butter
  • 1 c. brown sugar
  • 1/3 c. milk
  • 2 c. powdered sugar, sifted
  • 1 T. corn syrup
  • 4 T. milk
Melt butter in saucepan. Add brown sugar and bring to a boil, then continue boiling two minutes while stirring continuously. Reduce heat to medium-low and slowly stir in milk. Return to a boil and then remove from heat. Cool to lukewarm and slowly beat in powdered sugar and corn syrup. Add milk, one tablespoon at a time, until the glaze reaches a pouring consistency. You only want a thin coating of glaze on your treats, so if it's still too thick, microwave it for a few seconds and stir until it's nice and runny.
To create the drumsticks
  • Grab a handful of rice crispies and shape into a drumstick. Continue until all crispies are formed. 
  • Set up your glazing station, aka set a wire rack over a cookie sheet lined with parchment paper. This will let you scoop and reuse the glaze that drips off so you have enough to coat all your pieces. 
  • Drizzle spoonfuls of glaze over each piece and allow to set. 
Source: Inspired by Party Pinching; Glaze adapted from Cupcake Project

Monday, March 26, 2012

Sweet Sixteen: April Fool's!


Pin It!
The more I hang out with people from different countries, the more I realize that people really are very much alike. We all need food and water to stay alive, we all want to contribute to society, we all love playing practical jokes on our unsuspecting friends and family. And you're in luck today, because if you haven't already planned and prepped your own fool-worthy desserts, here are a few great ideas!

Oh, and if you just can't get enough of the jokes, check out Delish for some extreme food pranks that businesses pulled in the past. Hilarious!


(Left to Right, Top to Bottom)

Thursday, March 22, 2012

Lemon Ombre Cake with Vanilla Swiss Meringue Buttercream


Pin It!
So we're doing some major renovations at work and I am currently homeless...aka my desk got tossed and I'm now relegated to one of the overly cramped nursing stations or a single bookshelf. No, not a single bookshelf, but a single shelf on a bookshelf! But even though this sounds pretty much awful, at least I get to hang out by windows now! Can I just say, I love sunshine!


And then, last week, it was warm enough that I sat outside beneath my favorite tree while being berated by an angry squirrel for a solid three minutes (that's practically an eternity in squirrel time), enjoying some fresh, mulch-scented air. Ah, Spring!


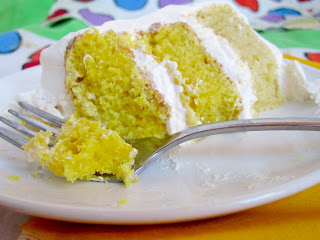
This has got to be the best way to celebrate the very first third day (yeah, I didn't get my act together that early) of my absolute favorite season of all (besides Fall...and now that I think about it, I do quite enjoy Summer, too...and Winter, in moderation, of course). Nothing like a slice of light lemon cake smothered in a fluffy Swiss Meringue Buttercream!


The really fun part about this cake is that it's an ombre, which means with each additional layer, the color intensifies. The yellow gradation, although it's apparently a little harder to distinguish than something dark like purple, made this little guy look like it was bursting with sunshine the second I cut into it!

Lemon Ombre Cake [click to print]
Makes four 6" layers
  • 2 c. plus 2 T. flour
  • 1 tsp. baking powder
  • 1/2 tsp. baking soda
  • 1/2 tsp. salt
  • 1 c. buttermilk
  • 1 tsp. vanilla extract
  • 1/2 tsp. lemon extract
  • 1-1/2 c. sugar
  • 1/2 c. unsalted butter, softened
  • 3 large eggs
  • 2 T. lemon zest (about 2 lemons)
  • yellow food coloring
Preheat oven to 350 F. Line cake pans with parchment paper or coat generously with nonstick cooking spray.

Whisk together dry ingredients and set aside. In separate bowl, whisk together buttermilk and extracts; set aside.

Cream butter and sugar in mixing bowl until well blended, about 5 minutes. Add eggs, one at a time, incorporating well between each addition. Alternately add flour and buttermilk mixture, beginning and ending with dry ingredients. Stir in zest.

Pour 1/4 batter into one pan. Add a few drops of food coloring to batter and stir to distribute evenly. Pour about 1/3 of remaining batter in second pan. Add a few more drops of food coloring and stir to distribute. Pour half in next pan. Add another squirt of food coloring and stir. Pour remaining batter in last pan.

Bake for 25-30 minutes until center springs back when lightly touched. Allow to cool completely before frosting.

Vanilla Swiss Meringue Buttercream 
Makes about 8 cups
  • 10 egg whites (about 1 cup)
  • 2 c. sugar, granulated not powdered!
  • 2 c. unsalted butter, softened
  • 1/4 tsp. salt
  • 1 T. vanilla extract
You're going to need a double boiler for this recipe, but if you don't have one, don't worry! I don't either. We'll use our makeshift double boilers together. All you need is a pot filled with about 2 or 3 cups of water, and a heat safe bowl (like ceramic, glass or metal) that sits comfortably on top of your pot. You don't want the bowl to sit too deep and touch the water or you'll cook your eggs and that's just nasty in meringue. Ew. 

So, now that you have your set up ready...

In bowl (not on the heat yet), whisk together egg whites and sugar until well combined. And before you have a cow from the fact that we're using egg whites here, yes, I mean you, Dad and Mama, use a candy thermometer to make sure your mixture reaches 160 F and you'll be fine. 

Anyway, when water is simmering, place bowl on pot/double boiler and heat, whisking continuously, until the sugar melts completely. Test this by rubbing a little bit of the mixture between your fingers and feeling for any grittiness. If it's still gritty, keep heating. 

Once smooth, remove from double boiler and whisk in salt. Pour mixture into bowl of stand mixer and mix on high speed with whisk attachment. If you don't have a stand mixer, a handheld is no problem. I just get bored standing around holding a mixer. Once the mixture comes to room temperature, about 10-15 minutes, you'll have a beautiful meringue that you can eat just as is, but we're making this into a buttercream, so press on!

Change to paddle attachment, if you have one, and add butter to the meringue, about 2 Tablespoons at a time. Make sure each chunk is fully incorporated before adding the next bit. Continue adding butter until all chunks are fully incorporated and mixture is smooth and creamy. 

At this point, you may be getting nervous because your buttercream is looking a little strange, but don't give up! If it's runny or soupy...stick the whole bowl in the fridge for about 10-15 minutes to firm up and then continue whipping. If it's curdled and sick...just keep mixing! It will smooth out and look delicious again. 
Once the buttercream is nice and smooth, add extract and mix to combine. 

Source: Cake adapted from Serious Eats; Swiss Meringue Buttercream adapted from Whisk-Kid

To Assemble
Center the yellowest layer on your cake plate and frost top with a thin layer of buttercream. Continue adding layers and buttercream until fully stacked. Frost sides of cake. Add copious amounts of sprinkles on top, adding extra as necessary. 

Tuesday, March 20, 2012

White Pepper and Ginger Lemon Cake


Pin It!

A year or so ago I made a mango cake with cayenne pepper and loved the little kick. Then when I went home for a visit, my little bro's wife Zaikea whipped up a batch of zippy white pepper Amish cookies. Of the ten or so cookies that I inhaled, I'd say they were delicious.


So when I found this recipe for Maida Heater (a fancy pants pastry chef)'s White Pepper and Ginger Lemon Cake, I knew I had to give it a try. Plus, lemons are the perfect summer fruit! Just look at that ooey, gooey glaze...oh my goodness, I think I'm making myself drool. Trust me, if you like a little heat (sorry, Stacie), you're gonna love it!


White Pepper and Ginger Lemon Cake with Ginger Glaze [click to print]
Makes one 12-cup bundt cake

For the cake

  • Few tablespoons coarse sugar
  • 3 c. flour
  • 2 tsp. white pepper
  • 1 tsp. baking powder
  • 1/2 tsp. baking soda
  • 1/2 tsp. salt
  • 2 T. lemon juice
  • 5 T. lemon zest (about 3 small lemons)
  • 1-1/2 T. (4-1/2 tsp.) ginger paste (or grated fresh ginger)
  • 1/2 tsp. lemon extract
  • 1 c. unsalted butter, softened
  • 1-1/2 c. sugar
  • 3 eggs
  • 1 c. buttermilk

For the Glaze: 

  • 2 c. powdered sugar
  • 1 T. unsalted butter, softened
  • 1 tsp. ginger paste (or fresh ground ginger)
  • 1/8 tsp. salt
  • 3-4 T. milk

Using nonstick cooking spray with flour included, generously coat bundt pan. Sprinkle coarse sugar in pan to lightly coat; set aside. Preheat oven to 350.


Whisk together flour, pepper, powder, soda and salt; set aside. In small bowl, whisk together juice, zest, ginger and extract; set aside.

In large mixing bowl, cream butter and sugar on low speed until pale and fluffy. Add eggs one at a time, incorporating well between each addition. Alternately add dry ingredients (about 3 additions) and buttermilk (about 2 additions). Stir in lemon mixture. Pour batter in bundt pan. Firmly tap pan on counter about 3 times to tap out any large air bubbles that may have been trapped when batter was poured into pan.


Bake at 350 for 55-60 minutes. Allow cake to cool in pan on wire rack for about 15 minutes. To remove from bundt pan, place wire rack over top of pan and invert, tapping gently on the sides to release, if necessary. Allow to cool completely on wire rack.

For the glaze, combine sugar, butter, zest, ginger and salt in mixing bowl. With mixer on low, add 3 Tablespoons milk. Slowly add additional milk, one teaspoon at a time until you reach desired consistency. Pour over cake and allow to set.

Source: Cake adapted from Sauce and Sensibility; Glaze is all Sugar Rush!

Friday, March 16, 2012

Mint Chocolate Leprechaun Cake


Pin It!

When I was little, my favorite color was purple. I loved purple shirts, purple crayons, purple freeze pops, purple people-eaters... And then, suddenly, I was just tired of it, so I changed my mind and decided my favorite color was green. An excellent choice, if I do say so myself. The only bad thing is, I choke on green freeze pops pretty much every time I eat one. Lame.


Every St. Patrick's Day, I get all decked out in as much of that blessed Irish green as possible or suffer the pinches of a handful of eager siblings and our dear father. This year is no exception. I have some green shoes and several appropriately colored shirts just kickin it in my closet, begging me to wear them now!


But I'm not stopping there this year. It's time to go green from the inside out. It's time for a striped leprechaun cake! The bonus being you get all that green goodness without the chokeable aspect of those lime-flavored tubes of ice.


This cake is striped vertically (to make leprechauns feel taller) with super moist chocolate and mint cake, covered in the fluffiest vanilla buttercream I ever made in my life, coated with chocolate ganache and sprinkled with shimmering gold dust. Seriously, what leprechaun wouldn't be attracted to this!

So Happy St. Patty's Day (tomorrow)!

Mint Chocolate Leprechaun Cake [click to print]
Makes one super thick 9" round layer (which I strongly recommend) OR three 8" round layers

  • 4 large eggs, whole
  • 2 egg yolks
  • 2 tsp. vanilla extract
  • 1-1/4 c. buttermilk
  • 3 c. flour
  • 2 c. sugar
  • 4-1/2 tsp. baking powder
  • 1/2 tsp. salt
  • 1 c. unsalted butter, softened
  • 5 T. dark cocoa powder
  • 1 tsp. mint extract
  • green gel food coloring
  • edible gold pearl dust
Line cake pan(s) with parchment paper and set aside. Preheat oven to 325 F if using 9x3" round cake pan or 350 F if using 8x1" round cake pans. 

In medium bowl, whisk together eggs, yolks, vanilla and 1/4 c. buttermilk. Set aside. In large mixing bowl, whisk together flour, sugar, powder and salt. Add remaining buttermilk and butter; beat on low speed until combined then increase speed to medium and beat until fluffy, about 2 minutes. 

Add egg mixture in about three additions and continue beating until just combined, scraping sides of bowl as needed. Divide batter in half. Add cocoa to half the batter and stir until evenly distributed. Add mint extract and food coloring (I used about 1 tsp) to the other half of the batter and stir to combine. 


Starting with chocolate, pour about 1/2 c. batter into center of pan, then pour 1/2 c. mint batter directly in center of chocolate to create a second layer. Continue alternating batters, always pouring in center of pan, allowing a few seconds between each addition for batter to start spreading (by itself, don't you dare spread it out with your cute little spatula!) towards edges of pan. Once your pan(s) are filled, bake 9" layer for 65-75 minutes or bake 8" layers for 28-32 minutes. 

Whipped Vanilla Buttercream
Makes enough to frost top and sides of 9" layer cake, you might want to double it if you are filling and frosting three 8" layers instead.
  • 3-1/2 c. powdered sugar
  • 1/4 c. unsalted butter, softened
  • 1 tsp. vanilla extract
  • 1/4 tsp. salt
  • 3-5 T. milk
Combine sugar, butter, vanilla and salt in large mixing bowl and beat on low until just combined, adding milk one tablespoon at a time until the right consistency. You want this stuff to be able to hold a peak and not just run right off the cake. Increase speed to medium-high and whip until light and fluffy, about 5 minutes. 

Semisweet Chocolate Ganache
Makes about 1 cup, just enough to smother the top of this cake!
  • 3/4 c. semisweet chocolate chips
  • 2/3 c. heavy whipping cream
Place chocolate in small bowl and set aside. Heat cream on stovetop until just frothy and steaming. Remove from heat before it boils and pour over chocolate. Allow mixture to sit about 2 minutes and then whisk until smooth. 


Allow ganache to cool to room temperature and thicken just enough to coat a spoon. 


To Assemble the Goodness


When cake is completely cool, spread a nice thick coating of frosting and allow to set about 15 minutes in refrigerator. Pour ganache in center of cake and spread over surface, allowing it to drip down over edges.


Sprinkle gold dust over surface of cake and enjoy!


Source: Cake adapted from Sweetapolita, Ganache from Betty Crocker
Related Posts Plugin for WordPress, Blogger...