Showing posts with label cupcake. Show all posts

Thursday, July 19, 2012

Cherry Limeade Cupcakes


Pin It!

I never even saw a Sonic in my life until I hung out with my AZ cousins one summer. Sure, I'd seen commercials, but I never went to one.


But, Rachel and Sarah were convinced that Cherry Limeade is the absolutely best drink in the world and you can only get it from Sonic. So of course we made a pit stop there one night.


They were right, Cherry Limeade is pretty good, but I wanted a stronger lime flavor and maybe in more of a desserty combination. Oh, yeah, it's cupcake time!


I love the flecks of neon red chopped maraschino cherries in the cupcakes and frosting. And the lime curd flavored filling really packs a refreshing punch!
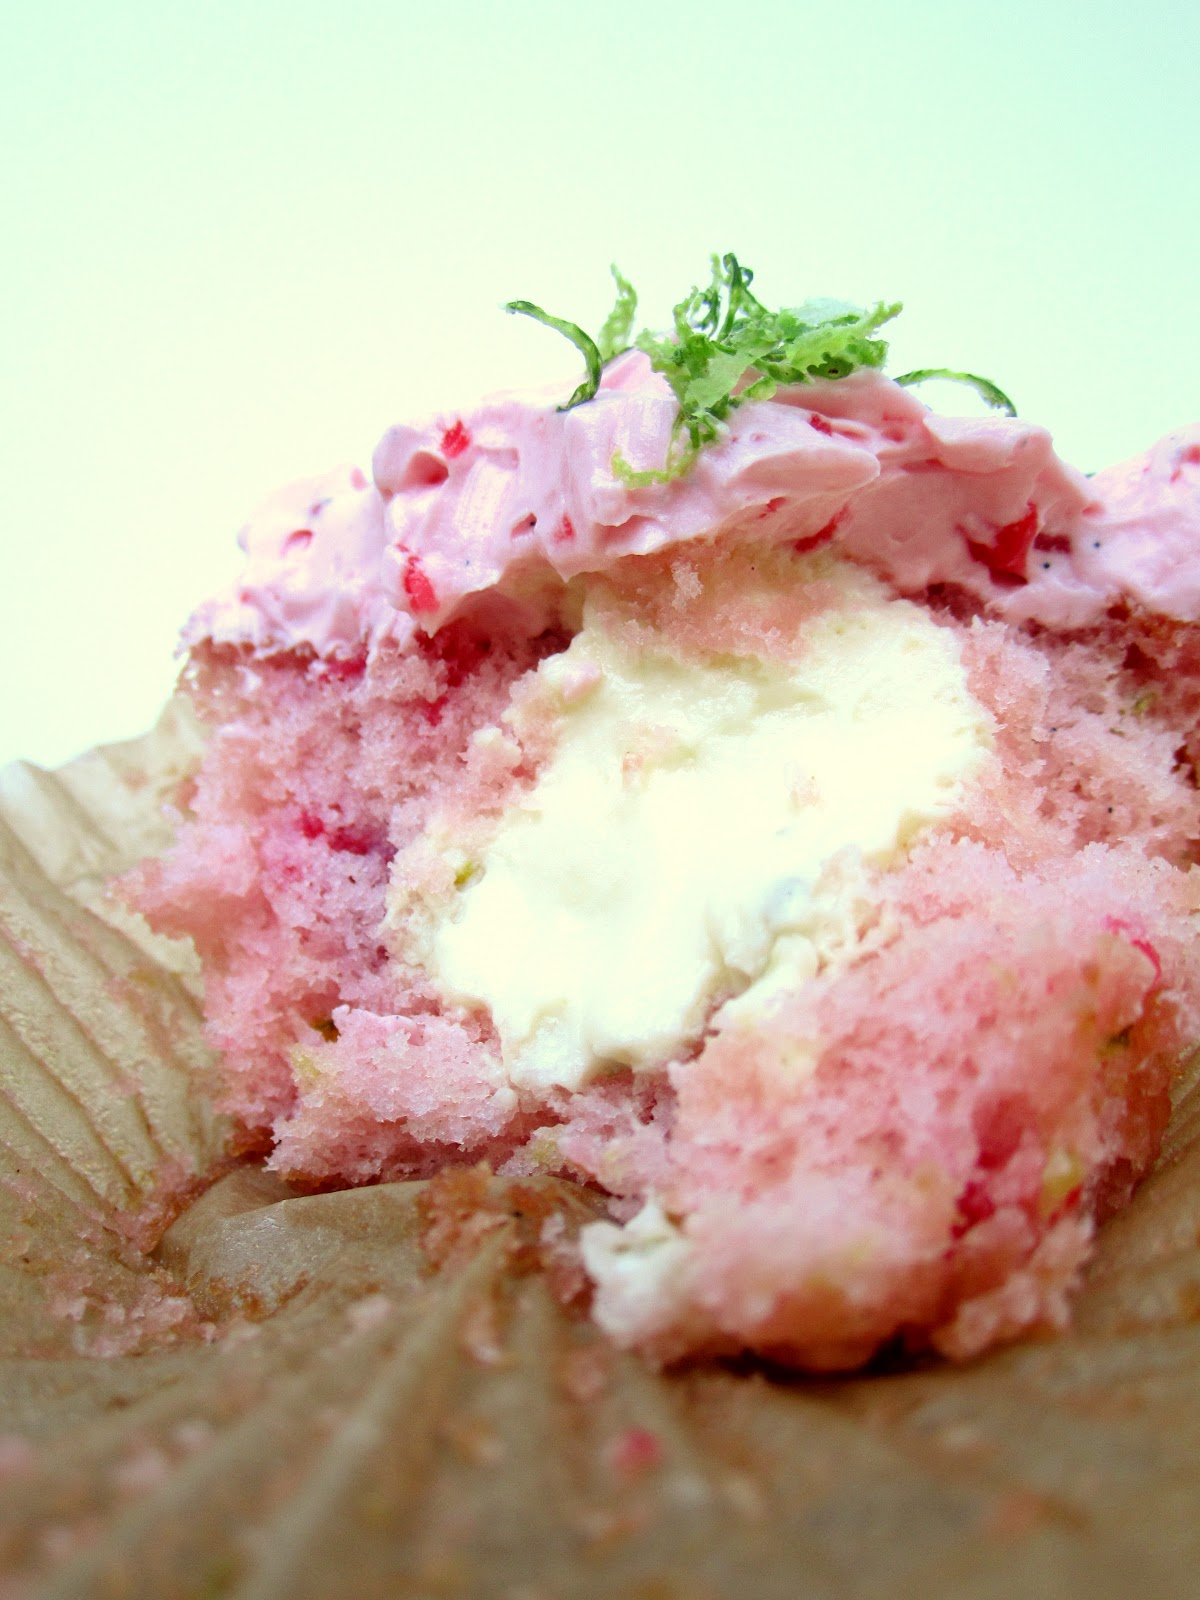


Aren't cherries and lime a great summer combination?


Cherry Limeade Cupcakes [click to print]
Makes about 2 dozen


For the cupcakes
  • 2 c. flour
  • 1 tsp. baking powder
  • 1/2 tsp. salt
  • 1/4 tsp. baking soda
  • zest from 1 lime (about 1-1/2 T.)
  • 1/2 c. whole milk
  • 1-1/2 tsp. lime juice
  • 1/4 c. maraschino cherry juice
  • 1 tsp. vanilla
  • 1-1/2 c. sugar 
  • 1/2 c. unsalted butter, softened
  • 4 egg whites
  • 1/2 c. maraschino cherries, chopped
For the filling
For the buttercream
  • 4 c. vanilla buttercream (French Buttercream is a great choice))
  • remaining maraschino juice and cherries, chopped (from 16 oz. jar; about 1/2 c. juice and 1/3 c. chopped cherries)
Preheat oven to 350 F. Line cupcake tin or coat generously with nonstick cooking spray; the kind with flour in it would be great for these.

Whisk together flour, powder, salt, soda and zest; set aside. In another bowl, whisk together buttermilk, cherry juice and vanilla and set aside. 

Cream sugar and butter in mixing bowl until light and fluffy. Add egg whites, one at a time, incorporating well between each addition. Alternately add flour and buttermilk mixture, begging and ending with flour and beating between each addition until just combined. Stir in chopped cherries. 

Scoop batter into prepared cupcake tin, filling each liner about 2/3 full. Bake 15-18 minutes or until top springs back when lightly touched. When cool enough to handle, transfer cupcakes to wire rack to cool completely.

For the filling, beat cream on medium high speed until stiff peaks form. Gently fold in curd until evenly combined. Scoop filling into pastry bag fitted with large plain decorating tip. To fill cupcakes, poke tip into top of cupcake, about 1/2 inch deep, and squeeze small amount of filling. You'll see the top of the cupcake rise slightly.

For buttercream, whip vanilla buttercream and chopped cherries/juice in mixing bowl until fluffy and cherries are well distributed. Generously frost each cupcake and dig in!

Source: Cupcakes adapted from Gimme Some Oven

Tuesday, July 10, 2012

Strawberry Banana Cupcakes


Pin It!

When I was little, we didn't really do milkshakes. I loved them, yes, we just didn't have them much. My favorite kind has gotta be oreo, packed with so many cookies there's just a little ice cream to help things slide down your throat. The only place fruit had in frozen treats/drinks was in a smoothie. And even then I was quite picky. 


My mom made an awesome strawberry banana smoothie. And so, instead of whipping up a blender full of that, I turned on the oven and baked in our 103 degree humid summer weather. Great idea, Molly.


But, I did promise I'd get my act together and whip up a batch of these babies! Plus they're really fast and easy. Please just tell me you still have some of that creamy French Strawberry Buttercream? A nice heaping mound of buttercream is perfect with these cupcakes since they're a little less sweet than most. Enjoy!


Strawberry Banana Cupcakes [click to print]
Makes about 24 cupcakes
  • 1/2 c. unsalted butter, softened
  • 1 c. brown sugar
  • 2 eggs
  • 2 tsp. vanilla extract
  • 2 c. flour 
  • 1 c. vanilla yogurt
  • 1 T. baking soda
  • 3/4 tsp. salt
  • 2 brown spotty bananas, about 1/2 c. mashed
  • 3 to 4 c. French Strawberry Buttercream
Preheat oven to 350 F and prepare muffin tin with liners or coat with nonstick cooking spray and set aside. 

In large mixing bowl, cream butter and sugar. Add eggs and extract, beating until well combined. Beat in flour, yogurt, soda and salt. Add mashed banana and mix until batter is well combined. 

Scoop batter into muffin tin and bake for 18 minutes or until top springs back when touched lightly.

Source: Adapted from Cupcake Project

Tuesday, June 26, 2012

Easiest Fluffy Chocolate Butter Cake


Pin It!


It's like I fell off the face of the earth. But in reality, I didn't even fall off that ladder when I was perched at the tippy top clamping strings of lights to the roof of my parents new porch. That's talent. 


I got to go home for nearly a week and kick it with the entire fam! I know you're jealous because I had tons of fun, and probably because my family is so awesome. But we can't help it.


But in the meantime, I really have been baking like crazy and writing thousands of blog posts in my mind. Unfortunately, as far as I know, you dear blog readers are not also mind readers. So I'm getting back on track and have some great recipes for you!


I think I baked a version of this chocolate cake about 18 times over the last week. That may or may not be a slight exaggeration, but I have really had several requests for this recipe. I mean, who wouldn't want such a soft, fluffy, moist chocolate cake that is pretty much the easiest butter cake recipe of my life? And paired with a thick layer or Salted Caramel Buttercream (recipe coming soon, I promise!)...heavenly!


And for all of you who have nightmares about baking anything from scratch, trust me, this is probably the easiest recipe of your life, too.

Easiest Fluffy Chocolate Butter Cake [click to print]
Makes 12 cupcakes or 1-8" OR 9" cake layer
  • 1-1/2 c. flour
  • 3/4 c. sugar
  • 1/2 c. cocoa powder
  • 1 tsp. baking soda
  • 1/2 tsp. salt
  • 1/2 c. butter, softened
  • 1/2 c. sour milk
  • 1/2 c. warm water
  • 1 tsp. vanilla extract
  • 1 egg
Preheat oven to 350 F. Prepare muffin tin with liners or line cake pan with parchment paper and set aside. 

In large mixing bowl, whisk together flours, sugar, cooca, soda and salt. Add butter, milk, water, extract and egg. Mix just until no butter chunks remain and mixture looks even. Scoop batter into cupcake liners or spread into cake pan. Bake cupcakes for 20-25 minutes or cake layer for 32-38 minutes or until center springs back when lightly touched. 

Thursday, May 3, 2012

Red Hot Velvet Cupcakes with Whipped Ganache


Pin It!

It's true. I quite literally turn up my nose at Red Velvet cake. I mean, really, who does that cake think it is? Kinda chocolate? Electric red? Let's be honest with ourselves here. Beyond looks, your typical Red Velvet Cake isn't a strong competitor. Plus it's usually coated with thick cream cheese frosting, which I adamantly despise.


Enter Red Hot Velvet. Now this cake's got it going on.


Imagine a moist and tender chocolate cake speckled with spices and crushed red hots. Seriously. Look at that beautiful texture! And then to finish things off, these little babies are topped with a thick pillow of Whipped Ganache Frosting. Oh. My. Goodness. Somebody get the rest of those cupcakes out of my kitchen asap.


So in honor of Cinco de Mayo and my (slightly) Mexican heritage, let's bring on the heat!


Red Hot Velvet Cupcakes with Whipped Ganache [click to print]
Makes about 12 cupcakes


For the Cake
  • 1-1/2 c. flour
  • 3/4 c. sugar
  • 1/2 c. cocoa powder
  • 1 tsp. baking soda
  • 1/2 tsp. salt
  • 1/2 tsp. cayenne pepper
  • 1/2 tsp. chipotle chili powder
  • 1/2 c. butter, softened
  • 1/2 c. sour milk
  • 1/2 c. warm water
  • 1 tsp. vanilla extract
  • 1 egg
  • 1/2 c. red hot candies, crushed
For the Whipped Ganache
  • 1-1/3 c. semisweet chocolate chips
  • 1/3 c. heavy cream
  • 2-3 T. heavy cream
Preheat oven to 350 F. Prepare muffin tin with liners or coat generously with nonstick cooking spray.

Whisk together flour, cocoa, soda, salt, pepper and chili powder. Add butter, milk, water, vanilla and egg. Mix just until no butter chunks remain. Stir in red hots. Scoop batter into cupcake liners and bake for 20-25 minutes or until center springs back when lightly touched.

While cooling, prepare ganache. Put chocolate chips in small, deep bowl and set aside. Heat 1/3 c. cream in small saucepan until just simmering. Immediately pour over chocolate chips and allow to sit for one minute. Stir until mixture is smooth and allow to cool until just firm. Whip with a handheld mixer until fluffy, adding an additional 2-3 T. cream until reaching the desired consistency. This stuff will firm up nicely so frost your cupcakes immediately. Devour.

Source: Cupcake recipe adapted from Oh SO Delicioso

Monday, April 16, 2012

Sweet Sixteen: Earth Day


Pin It!
Earth Day is one of those holidays that you usually forget about until you're surrounded by a bunch of over-excited elementary school children screaming and running and digging holes all over the place to plant new flowers. Oh, man. I loved 4th grade. This week's roundup of tasty treats is sure to please the kid in all of us!


(Left to Right, Top to Bottom)

Monday, March 26, 2012

Sweet Sixteen: April Fool's!


Pin It!
The more I hang out with people from different countries, the more I realize that people really are very much alike. We all need food and water to stay alive, we all want to contribute to society, we all love playing practical jokes on our unsuspecting friends and family. And you're in luck today, because if you haven't already planned and prepped your own fool-worthy desserts, here are a few great ideas!

Oh, and if you just can't get enough of the jokes, check out Delish for some extreme food pranks that businesses pulled in the past. Hilarious!


(Left to Right, Top to Bottom)

Tuesday, March 6, 2012

Homemade Hostess Cupcakes


Pin It!

I'd be lying if I told you I remember downing cellophane wrapped packages of Hostess cupcakes in my elementary school cafeteria. Or if I said I rummaged through our kitchen cabinets when my mom was at work to sneak a chocolatey treat. I mostly remember being fascinated by their delicate white swirls across the middle of a deep, smooth chocolate frosting staring at me from the aisles of the gas station mini market. 


But please don't doubt my credibility here! I have ever eaten these little guys. Every time I do, though, I wish for a little richer, less greasy cupcake with a bigger blob of fluffy white cream filling. Thanks to some great bakers and my crowd of ever ready taste testers, these homemade Hostess cupcakes fit the bill!


Hostess Cupcakes [click to print]
Makes about 1 dozen


For the Cupcakes:

  • 1/2 c. plus 2 T. flour
  • 1/3 c. cocoa powder
  • 1/2 tsp. baking powder
  • 1/4 tsp. baking soda
  • 1/8 tsp. salt
  • 2 eggs, large
  • 1/3 c. unsalted butter, softened
  • 1/2 c. plus 2 T. sugar
  • 2 T. buttermilk
  • 1 tsp. vanilla extract

For the Creamy Filling:

  • 1/2 c. milk
  • 2-1/2 T. flour
  • 1/2 c. shortening
  • 1/2 c. sugar
  • 1/4 tsp. salt
  • 1/2 tsp. vanilla
  • 2 c. powdered sugar

For the Ganache Frosting:

  • 1/3 c. heavy whipping cream
  • 1 T. unsalted butter, softened
  • 6 oz. dark chocolate, chips or chunked

Preheat oven to 350 F. Line cupcake tin with liners and set aside.


Whisk together flour, cocoa, powder, soda and salt; set aside. Combine butter and sugar in mixer bowl and cream until light and fluffy. Add eggs, one at a time, incorporating well between each addition. Add dry ingredients and continue mixing until mostly combined, then add buttermilk and vanilla. Mix on low speed an additional 30 seconds.

Scoop batter into cupcake liners, filling about 2/3 full. Bake at 350  F for 13-15 mminutes. Allow cupcakes to cool completely before filling.

In small saucepan, gradually blend milk into flour, whisking until there aren't any lumps. Cook on medium low heat, stirring constantly, until the mixture turns to a thick paste. Be careful, though, because it will seem like nothing's happening and then all of a sudden it's really thick and can burn easily. Allow mixture to cool to lukewarm.

Meanwhile, cream shortening, sugar and salt in mixer. Add warm paste and continue beating until light and fluffy. Add vanilla. Mix in powdered sugar in about three additions.

Scoop filling into pastry bag fitted with large tip. If you have a fancy cupcake filling tip, use that one, but I used a Wilton #12 tip and it worked just perfectly. Poke tip about 1/2" into top of cupcake and squeeze in a small amount of filling. You'll know you squeezed enough when you see the top of the cupcake rise a little bit. Remove tip and fill remaining cupcakes. If the filling oozes a little, just scrape it off.


To make the frosting, place chocolate in deep bowl and set aside. In small saucepan, heat cream and butter until simmering, but not boiling. Pour over chocolate and allow to sit about 5 minutes. Stir mixture until smooth and evenly combined. Dip the top of each cupcake in ganache and allow to set about 10 minutes in refrigerator. Repeat 1-2 times or until desired thickness is reached.

Change tip on pastry bag to a fine, plain point; I used Wilton #3. Pipe swirls across the top of each cupcake. Refrigerate about 10 minutes to set.


Source: Cupcakes and frosting adapted from Culinary in the Country; Filling from my Great Grandmother Mattie Foote

Monday, February 20, 2012

Thursday, February 2, 2012

Groundhog's Day


Pin It!
I love holidays, as you may have noticed. Groundhog's Day is a big deal when you grow up in Pennsylvania. Mr. Punxsatawney Phil lives in that wonderful state! And every year, the mayor of Punxsatawney, PA drags that poor sleeping groundhog out of his burrow to predict how much longer the bitter winter will last. Cross your fingers for an early spring!


What could possibly make this rodent-dedicated holiday any better? Groundhog pops, of course! If you're looking for something even more decadent than these cute little groundhogs, try using them as a cupcake topper! And if you're against candy with preservative-laden ingredient lists, check back soon for a homemade almond joy recipe!


Oh, and not only is Groundhog's Day fun (and a little funny) but it practically belongs to my oldest brother. Happy Birthday, Chip! You're one year more awesome today!

Groundhog Pops [click to print]
Makes about 20 pops


1 bag snack size Almond Joy candy bars, unwrapped (about 20 pieces)
20 lollipop or mini popsicle sticks
20 red or pink dragees
1 bag M&M minis
1 tube black decorator's gel
1-1/2 c. white frosting in piping bag or ziploc baggie with end snipped off
1/2 c. chocolate chips, melted in ziploc baggie with end snipped off


Insert one stick about 2" deep into each candy bar and arrange on wax paper. Squeeze a small triangle of melted chocolate on the upper half of the almond. Place two brown mini M&M's on the corners of the triangle for cheeks. Place a red dragee on the point of the melted chocolate for a nose.


Pipe a small white rectangle of frosting under the cheeks for buck teeth. If you want the edges to be sharper, allow to set a few seconds, then shape with a toothpick. Pipe two white eyeballs above the almond. Use a toothpick to dab a small dot of black decorator's gel onto each eyeball.


Squeeze a small blob/triangle on the top corners of each candy for ears. Poke lollipop stick in a stand, or apple, like I used, and allow ears to set in the refrigerator. Repeat with remaining candy bars and experience some Groundhog's Day Joy!

Source: Adapted from Sweetology 101

Monday, November 21, 2011

Wednesday, September 21, 2011

Brown Butter Cupcakes with Pumpkin Pie Frosting


Pin It!
After forgetting my fries under the broiler, making extra toasty enchiladas and burning my soup...in a crockpot...I realized something. I'm pretty good at burning things. Normally, this would not be good news, but when I came across Cupcake Project's Browned Butter Cupcakes, I knew I had to give them a try.

I tested this recipe using margarine and then again with real butter. Believe me, browned margarine tastes absolutely nothing like browned butter. Definitely worth the extra $2 for real butter to get that delicious caramely flavor. 

When you're browning the butter, use a pan with a light colored finish so you can keep track of how dark your butter is getting. It can happen pretty quickly. And if you don't have cake flour on hand, substitute the cake flour with 1-1/2 c. all-purpose flour plus 2 T. potato (or corn) starch.

And to top it all off, these cupcakes deserved more than just a boring old spiced buttercream. These babies were covered with pumpkin pie. Yes, I said it. Actual pumpkin pie. You just prepare and bake pumpkin pie filling/custard stuff as normal, without the crust. Once it's done baking and has cooled, stir it up until smooth and pipe it onto your cupcakes. Thanks for that idea, too, Cupcake Project! These were delicious and perfect for the start of fall!
Related Posts Plugin for WordPress, Blogger...